Tuesday, August 25, 2015

Border Maker System
(includes Picket Fence Border Maker Cartridge)
Filmstrip Cartridge
Pick your flavor of cardstock
Use with an Album of your choice

Friday, August 21, 2015

Fun uses for the Creative Memories Border Maker Cartridge - Fence

Just letting a little Sunshine into your day with a fun
page using the "Fence" cartridge. This 
cartridge is included when you purchase
the new Creative Memories Border Maker system.


Easy Peasy directions: 
Simply cut a few strips of your favorite paper 
using the "Fence" Border Maker Cartridge. 
These will be your "earth" at the bottom of the page. 

Weave some coordinating paper through the loops. 

At the base of the bottom of the page I used a 
piece of green paper from the "*Film Strip" cartridge. I trimmed 
off one edge leaving the "bottom green strip" and the "stems"
add stars or flowers or whatever you like to be your "garden"

Next, with your Border Maker Fence Cartridge, 
create the "sun shine" rays 
(you pick your sunshine colors)

Add two photo mats

Final decoration, use the piece of  *film strip you previously trimmed off
and create a "stem" for your Flower. 
Add petals made from the Fence cartridge.

DONE! 
(well, add some journaling and maybe a title :-) )


*Also used in this design is the 
"Film Strip" cartridge (currently unavailable)


Tuesday, August 18, 2015

Easy project for the day. London Bridge 
NOT failing down!!

HERE is a GREAT video on how to use the Border Maker??

CLICK HERE for YouTube video on Border Maker

Order your Border Maker System today at my website:

CLICK HERE to visit my Creative Memories site!

Monday, August 17, 2015


BACK TO SCHOOL is ALWAYS a fun opportunity 
to create a special scrapbook page. 
Here's an idea using a couple of our border makers, 
some letters and a few hearts to spread the love. 
Visit my Creative Memories page to order your
supplies and GET STARTED saving those memories TODAY!
www.creativememories.com/user/deborah


----------DIRECTIONS FOR YOUR LE TOUR EIFFEL-----------
(1) ...create the base 5" - half circle ...1/2" wide 
IF you have the the Custom Cutting System here is the recipe:
#5 Disk with blue trimmer to cut main circle
then from the circle I trimmed off 1/2" using #4 Disk and red trimmer

(2) Cut in half (only using half) save the other half for something else :-)


(3) Add 2 of the 4 box pieces of Film Strip

(4) Add next 4 box Film Strip across top of those

 (5) Add 2 - 4 box strips close together to create narror portion of Le Tour Eiffel

(6) Now add 3 box Film Strip centered across this section


(7) Last 2 box film strip section goes in the middle at the top


 FINALLY...at the top. It is a small hexagon (see main picture)
made with the "Place n Punch" (or trim a square) LAST...draw an antenna --- "Fini" (finished)


YES...it's TRUE!!! Paris is always a GOOD IDEA! 
More to come, stay tuned! 
Get all the products you need to complete this FUN and FOCUSED scrapbook page.
Shop with me at - www.creativememories.com/user/deborah 

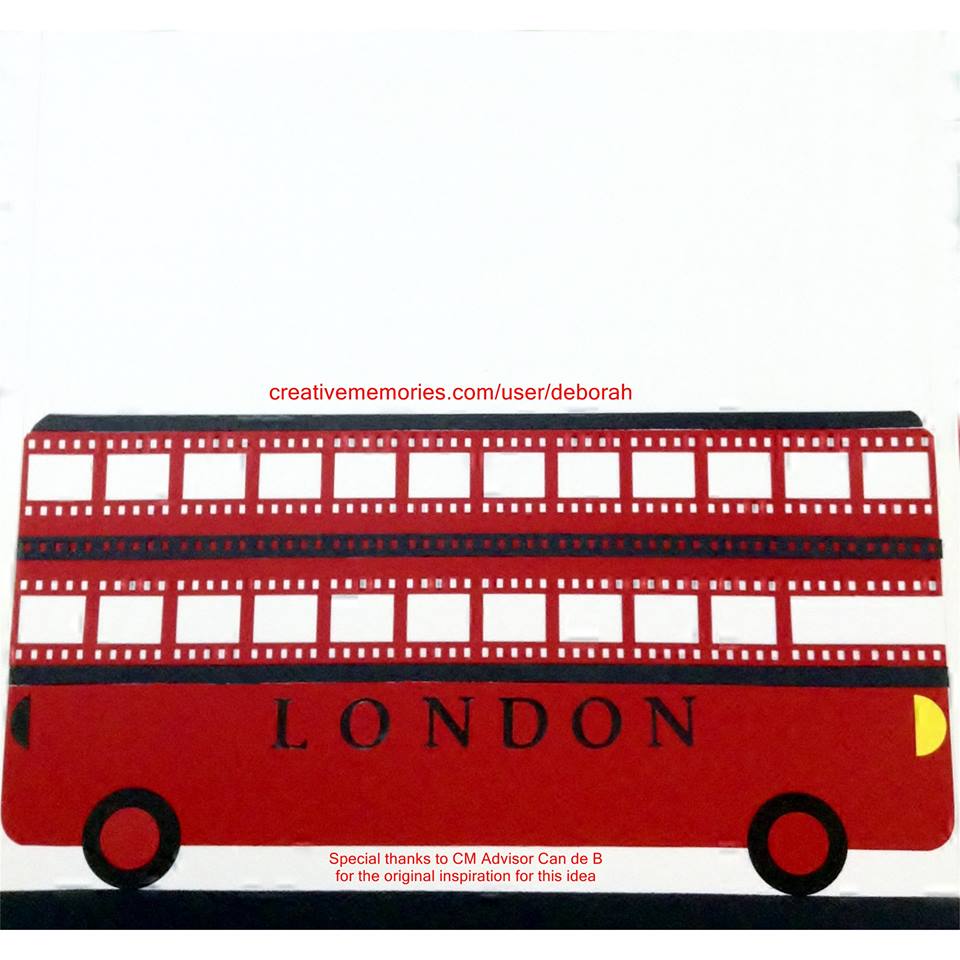
Let's get on the Double Decker Bus for LONDON!!!

1)  Cut 1 strip of Red paper 3" wide
2)  Use your Film Strip Border Maker on both sides of that strip. 
----These are your windows. 
3)  Trim one film strip bar off the area which will be the drivers area 
----(see pic above...lower windows)
4)  Cut 1 x 12" Film Strip in Black
----trim off one edge, this is your accent in between your row of windows.
5)  Cut one strip of red paper 2 1/4" wide x 12" long (bus body).
----Use your corner rounder for only the bottom edge corners of the bus body.
6)  Add Bus body 1" from the bottom of the page.
7)  Cut 1 x 1/2" strip of black paper - this is your road. 
----Add at very bottom of page. 
7)  Put your window strip right next to your bus body strip (no gaps)
6)  Cut 2 x 1/4" strips of black paper (accent strip on bus body and roof) 
----you will need to give the top black strip a curve for ends of bus
----SEE PHOTO for corners that need rounding - there are four.
Finish your bus with circles of Red and Black for your wheels.
Create a 2 half circles in yellow and black for your headlight and tail light.


Decorate with letters and places for photos. Your choice!


Follow me for the techniques and the products
 to achieve this amazing addition AND MORE 
for YOUR travel scrapbook pages!!!
www.creativememories.com/user/deborah