Sunday, April 3, 2016

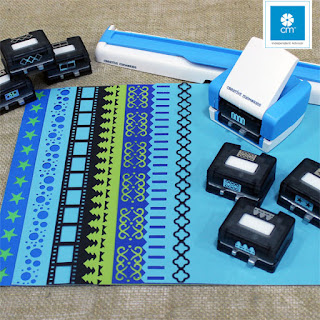
Creative Memories Border Maker Punch Fun


HAVE you seen THESE amazing TOOLS?!!!!!
This Border Maker Cartridge system will give you lots of
 ways to make YOUR scrapbook pages AWESOME!!!


Please note: Border Maker Cartridge offerings at Creative Memories
are updated frequently and you may not always find all of the 
punches I feature here on my blog. Don't Worry!! This only means there is 
something new and exciting about to launch just around the corner. 
SO...stay tuned, watch my blog and visit my Creative Memories 
website to stay current with all there is to fulfill all your crafty needs.
Cheerfully, The Crafty Visionary! 

Wednesday, March 9, 2016

Greetings with a Card
by Deborah
Let's get back to using snail mail with these quick
and easy beauties. YOU KNOW you love getting cards
in the mail. START SENDING THEM TOO!!!

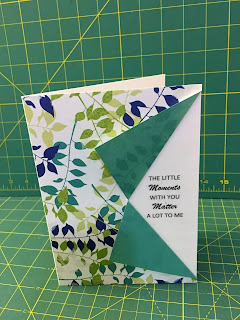
These cards were created using Creative Memories decorative papers and
some amazing CM tools...you TOO can create these greeting cards


 Border Cartridge Punch (Film Strip) and heart punches


A little Digital will do ya!!! Using Artisan software I created
this clever greeting to personalize this card. 


5 x 7 greeting card, 5 x 7 decorative paper
cut a small slit just about half way at middle
and fold back edges to revile your sentiment

Photograph by Deborah Gonzalez, personalized using
Artisan Software, mounted on a card with a colorful mat
and decorated with the "Flower Chain" border cartridge detail.

Tuesday, January 19, 2016


Dress to Impress!! 
Engagement, Tea Party, Prom, Wedding day...
you decide what special occasion 
wins honors to land on this 
simple yet creative page layout!

1) pick your favorite cartridge from 
the "Border Maker System" and decorate
one edge of the paper you have chosen.

2) Cut 9 strips x 1" of this decorated sheet.
Set aside two strips at 12" for the sides of your page.

3) Take the 7 remaining strips and cut 6 1/2" off
each one, this will be the skirt portion of your dress.

4) With the remaining portion of each strip
measure 3 1/2" and cut. These pieces will
be the bodice (or top) of your dress.
(do what you like with your left overs) 
5) Arrange on your page in a "fan" design, 
skirt and bodice to meet in the middle (see example)
6)  Create a coordinating color for the belt.
When you use my Creative Memories paper
you will have the advantage of reversible paper
for all of your page designs as each and every 
paper pack have coordinating colors on both sides.
7) Finally, add the 12" decorative strips to the left and right
sides of your page. Add photos/mats....AND YOU'RE DONE!

Enjoy this clever and fun 
way to create the page you
always dreamed of to highlight...
"THE DRESS"


Monday, January 11, 2016

Friday, January 8, 2016

Be sure to TAKE THAT PHOTO
and PRINT IT!

Save it in a album to enjoy for years to come!
Visit my Creative Memories page and order your albums and supplies TODAY

BORDER-MANIA.....
you haven't had THIS much fun with paper
EVER!!!
Save your photos and border the pages with LOVE!